Tom's OnBoard Air Conversion - 1977 Scout II
Well, after listening to the wonders of on-board air, and realizing I
don't have an air compressor in my garage (and that in the near future,
it won't be MY garage anymore, since I'll be moving out.. and I wouldn't
want to leave a compressor behind for *mom* to use!)..
I decided to install on-board air on my Scouts! :-)
And of course, just wanting to play with that "coolness factor" of
pulling out the Impact Wrench the next time I get a flat.. or, as John
Landry has done, rushing to the aid of the wounded motorist that has a
flat spare.. Thus
far, only the '77 has been treated to air, but it's part of my '72 build
up (when I get the poor thing home)..
Anyhow... there are a few other webpages I used for some reference:
Just to refresh everyone's memory, one of my two Scouts is a 1977 Scout
II. Originally had a 304, but a 196 had been swapped in before I got
it. It has power steering (which is mounted away from the motor on a
nifty bracket), and an alternator. Two pulleys on the crank and water
pump, one pulley on the alt and the power steering pump.
Ken Kitchcox was kind enough to donate the AC bracket for the price of
shipping (thanks, Ken!)
With the AC bracket in hand, I took a few peeks at my Scout to measure
things up. The bracket completely replaces the stock Alternator
bracket. It mounts using 3 bolts in a triangle pattern on the front of
the block. Two are the alt. bracket bolts. A flat "plate" is
horizontal, which is where the Compressor mounts, while the alternator
"hangs" upside down from the AC bracket.
I also went shopping..
- Square D 95/125psi pressure switch - $25 or so
- Safety 150psi pop-off valve - $10 or less
- 3-1 "mushroom" air manifold - $10
- 5 piece quick connect set - $6
- Extra quick connect parts - $6
- Air pressure gauge - $7
- Teflon Tape - $1
- 60' of 3/8" air hose - $10 @ Walmart
- 50' of 1/4" coiled air hose - $10 @ Walmart
- Check valve - 1/2" NPT, so I bought 1/4" --> 1/2" adapters too
- Other goodies:
- 3/8" to 1/4NPT hose barbs - a few
- 1/4" NPT pipes. A few different lengths, including some very
short joiners
- 1/4"NPT 90deg elbows - a few
- 1/4"NPT fem-fem joiners
- Hose clamps
- 1/2" pipe mounting brackets & some bolts
- 1/4"NPT 3way female "T" fitting
- Electrical wire, light-up rocker switch and mounting panel
I also had to buy a York air compressor! :-) $35 at the local junk
yard.. taken from a Jeep! I have another page York
Air Compressors that describes the model numbers and output ratings.
I started off by playing around with the various fittings and
experimenting. The design I ended up with is as follows:
The "T" is at the end of a short pipe. One side of the T then goes to
the check valve stuff. One side of the T goes to a flexible hose to the
pressure switch. The "T" of the "T" fitting goes to the short pipe,
which then goes into the bottom of the "mushroom" 3-->1 manifold. On the
manifold is the pop-off valve, a short pipe, with an elbow, and the
pressure gauge, and the third output has a short pipe with the quick
disconnect on it.
I placed this concoction against the passenger side inner fender. I
found that I could put the "mushroom" just above the fender lip, with the
tube and the T below the lip, and place one pipe-mount U-shaped thing
over the short pipe, just below the bend in the inner fender (just below
the "ledge"). I mounted all of this between the heater and the washer
bottle.. it seemed like an unused space.
Once I figured out the fitting mount location, I went to the "real"
work. I disconnected the battery, and then removed the alternator
bracket. I set the alt aside, and then bolted on the new AC bracket. (I
also had to EZ-Out a bolt that was broken on the alt bracket when I bought
the
truck) I put ONE bolt into the AC bracket (the farthest "inward" bolt
on the very end), and then rotated the bracket upwards. I then mounted
the alternator to the AC bracket.
I put the AC bracket down, until the mounting face was level, and then
inserted the other three bolts. NOTE: I'll add in here that you
need to buy new bolts. They are 3/8" bolts, I think I used two 2.5 or 3"
bolts, and one 2" or 2.5" bolt (I bought a few of 'em). Just measure the
AC bracket width and head down to the hardware store. I used all Grade
8, but that's just me.
With the bracket in place, I crawled under the truck to take a peek at
the alternator. The alternator only setup uses an offset swing-arm for
tensioning of the alternator. Well, the "offset" (or "kink") in the
swing/slide-arm goes the WRONG WAY when you mount the alternator upside
down! I had a straight (flat) bracket from a Buick I'd parted out lying
around.. but it was too long. After cutting it with a hacksaw, I
discovered the "arc" of the bracket wasn't enough.. it wouldn't curve
around the alternator. So, I contented myself with putting the
wrong-direction offset stock swing-arm back on. I'm going to buy a short
piece of steel tube, and a longer bolt. I'll then build a short spacer
between the swing-arm tensioner and the alterntor. See below about why
that hasn't happened yet.
Now that I'd determined how to go about the alternator, I went back to
work on the compressor (BTW, I did this all Sunday afternoon, and I
needed time to get to the parts store for new belts.. to get the
alternator and such working so I could get to work on Monday!).
The compressor I bought had a bracket on the bottom. I removed this and
the 3 bolts that held the bracket on. I then placed the compressor on
the Scout II AC bracket, with the hoses going towards the engine (not the
passenger fender), and looked at things.
The junk yard had cut the original AC hoses off.. just a little past the
steel fittings on the compressor! Luckily, they were a 3/8" "hose barb"
type fitting.. thus I had bought the 3/8" air hose from Walmart.
I cut a short length of hose (used some shears, brake/fuel line tube
cutters won't do it.. I tried!). I then needed to get the hose off the
compressor "hose barb." I also needed to rotate one of the fittings
around, so they both faced "backwards" when I mounted the compressor.
No amount of pulling, prying, or hacking with a screwdriver got the hose
off. The fitting itself comes off very easily, held on by two bolts.
Once I'd pulled the two bolts out and removed the fitting, I fired up the
propane torch. It still took 5 or 10 minutes to burn the old hoses off.
I did this on both the SUCTION and the DISCHARGE sides.
I re-installed the hose-barb pieces of the compressor, and then mounted
it on the bracket.
I'll add here about V-belts. At first, I wanted a 70" V-belt to go
around the compressor, alt, crank, and waterpump. This was not available
at the closest store (5 blocks), so I bought a "stock" 51" AC belt. This
AC belt went around the compressor, and the water pump just fine. I
still needed the alternator belt, and with 6pm fast approaching, I took
another string around the alt/crank (since I only have 2 pulleys on each,
I now have the Compressor and P/S to the water pump, and the Alt and PS
to the crank.. the PS is the only connection between the water pump and
the crank pulleys). I ran across town to a different store (first one
closed at 5pm), and bought another belt. The belt I bought was just a
*little* too short.. but, it was after 6pm. The belt *barely* fit around
the alt/crank.. but I couldn't get it "on".. I ended up doing a no-no,
and I put the belt halfway around the crank, then hit the starter to slip
it on. Currently, the swing-arm is NOT connected, and everything works
fine. I have the right length belt in the garage, but haven't picked up
the parts for the spacer on the swing-arm (all this AC stuff left me broke!)
I'm not sure what the PROPER setup is, but I know it involves some longer
belts, and 3 pulleys on the motor..
Anyhow, I mounted the compressor on the bracket, and pulled the belt
tight, then tightened up the compressor to bracket bolts.
At this point, Sunday was over, and I needed to get to bed.. but before I
did, I fired up the Scout, and took a Jumper Cable from the + battery
terminal to the compressor clutch wire.. it works!
Went back out the next day. This is when I mounted the air manifold
fittings and such to the fender. Very straightforward install. However,
I did a few things first.
I cut some hose and fitted it to the intake and outlet of the
compressor. This was a bit difficult to do, but I finally got it. I
then used the hose-clamps to tighten it down. At the moment, the
discharge is a short line, that hits a 90deg elbow, and then a flexible
hose down to the check valve on the "front" side of the T. I put the
connection in the middle because I plan on buying a $20 Air /water filter
from WalMart soon. This will be mounted on some strap steel mounted to
the compressor, so the filter hangs from it on the "rear" side of the
compressor.. saving space! I also cut the hose to go from the other side
of the T to my pressure switch. This piece got a hose barb and hose
clamp on either end. I ran the hose up to the firewall, near the hood
catch.
It is important to try to do this all at once, since you need air-tight
connections (use that Teflon and wrap it the right way), and you really
need to tighten up the connections as best you can. That's why I hooked
it all up at once, being able to twist the whole mess around and tighten
things up. Once that was done, I mounted the fitting mess to the fender
as I described earlier.
Also note that I'm not running an air tank at the moment, nor did I put
the plumbing in.. I wanted to add another "T" next to the existing one,
with a hose running under the body to the bed area, and mount a tank
either where my second muffler would go (the 196 doesn't have dual
exhaust) or under the bed farther back. I didn't get the extra T until
after I had mounted the other fittings, and I was just plain tired of
messing with it!
Again, I think it was about this point that I stopped. The intake of the
compressor has NO filter on it at the moment, though it'll get one soon.
Third day I finished things up. I bought a piece of angle-bracket with
cast holes in it from the hardware store. I then slipped this against
the underside of the cowl, and put the pressure switch between it and the
firewall. To describe it. The angle is an "L" One side of the "L" runs
along the underside of the cowl plate, while the other side of the "L"
dangles out in space, a few inches from the firewall. I mounted the
switch to the side of the "L".
I cut one side of the "L" down a bit to match the width of the pressure
switch. I then added a new hole in the "L". I placed the "L" against
the firewall, and then marked where an existing windshield-washer hose
clamp-down (and cowl plate holder) screw hole was, and drilled a hole in
the bracket. I also widened up the hole in the cowl.
I then adjusted the pressure switch, and figured out the wiring. The
switch I bought has 4 contacts. Two outer have a "switch" on 'em, while
the two inner run to a "M" on the wiring diagram. This didn't quite make
sense to me.
In the end, I found out I needed to run juice to one "end connector
(switch)", and from the middle connector closest to my juice lead, I ran a
wire to the compressor clutch (compressor grounds through the case).
I'll also add that I "tightened up" the switch at first, but it kept
blowing the pop-off valve, and I ended up "loosening" the switch. It
currently shuts off at 120psi, and kicks on at 80psi.
With the wiring done, and the system tested, I found a leak at the
output-elbow. Took the fitting out of the compressor, and then tightened
the elbow up, then re-installed on the compressor. Fixed it!
I then mounted the pressure switch. I ran a long bolt through the two
large holes in the switch body to the side of the "L" bracket. I put the
pastic cover on, and put one short bolt through the "top" side of the "L"
bracket, and then up through the cowl and put a nut on the top. I
mounted the switch to the passenger side of the hood latch, with the hose
fitting towards the passenger side (where all the other stuff for the air
is anyhow).
For power, I ran a wire off the ACC tab on the fuse panel (I've spoken of
this before. It's a tab on the back of the fuse panel that's hot when
ACC or ON. My keyswitch needs worked on, so I have no ACC, so this was a
good choice for me.) to the lighted rocker switch. I actually have a
3-rocker panel mounted to the right of the column. I used one existing
bolt, and with the 3-switch panel, I drilled a second hole for more
support (I had my single KC switch mounted to the stock screw/bolt). I
then re-intalled my KC Daylighter switch all the way to the right, and
the new glow rocker for the compressor on the left side of the 3-switch
panel. The other side of this switch went back up the firewall, and out
into the engine bay via a wire bundle near the power brake booster. I've
run a lot of wire through there.. :-) This wire then went to the switch,
and then on to the compressor clutch.
With the wiring done, and the air fittings hooked up, I fired up the
Scout again, and then flipped on the compressor switch.. Whir Whir whir..
click. Look at the pressure gauge, and I have air! (I've just omitted my
pop-pop-pop problem, and the subsequent tear out of the pressure switch
to adjust it down).
I then took my 50' coil hose, put one disconnect plug on an end, and the
other end received another disconnect female. I then took a disconnect
plug, and mated it to the $5 "blow gun" I bought. Another plug was
installed on a $3 air-chuck (gonna get the $10 model with the long stem
and the air gauge built in.. soon)
I hooked the coil up to the quick disconnect (between the heater and
washer bottle), and played around with the blowgun. Pfft. Pfft. I seem
to stay at 40psi, compressor running, when I just hold the blowgun ON.
While playing, I noticed I have a slight air leak.. it won't hold it for
very long if I shut the compressor down. Oh well.
I then aired up one of my tires (slow leak I haven't fixed).. smiled, and
headed to bed.. it was midnight for the third night in a row!
MORE THOUGHTS:
I spent around 20 hours on this project, and probably over $100 total.
But, by golly, I wanted it! Now I need to get the air filter, pressure
regulator, and an oiler.. along with an intake filter. Then I'll hit the
pawn shops and start collecting Air Tools!.
I also noticed my compressor needs oil.. I put a bit in, but it still
showed low. Gonna check it again tomorrow and see if it's the same (I
wanted to run it a few times to let the oil flow around before I dump
more in).
I need to get the some extra pulleys for the motor, and fix that
alternator bracket issue as well.
Also, to those who don't know any better (I didn't): The Propane and some
water fittings are IDENTICAL to the air stuff! I paid $1.39 for a 3/8"
--> 1/4"NPT hose barb from the "Air Compressor" area.. $1.19 if you get
the SAME PART from the propane area! This goes for the short tubes as well..
NEXT TIME:
When I do my '72, I'll do things a little differently. I'll get the
right alternator adjuster / slide bracket for one. Right belts and
pulleys to start things off with. I've also found a much better air
manifold ("T's") setup as well. www.northern-online.com (sorry, catalog
isn't online at the moment, but you can order a catalog) has a nice 5-1
air manifold. It's a long square tube. One female 3/8" NPT on the end,
with 5 1/4" NPTs along one side of the square tube. I'll mount this
along the fender lip, with the input from the compressor going in the
end. Then one fitting for the pop-off, quick connect, gauge, pressure
switch, and one fitting for a flexible hose to run to the under-bed air
tank (when I get it). I'll also have a large assortment of little
fittings left over still.. :-)
I'll add a picture or three when I get a chance to take 'em. Until then,
let me know what you think, any comments suggestions, etc.. just drop 'em
my way! I'll be glad to try and answer 'em.
I need to say a few thanks.. to the websites mentioned above, various
members of the IHC Digest, and
in particular, Mr. John Landry for all of the help!
THANKS!
Next up - relocate the windshield washer bottle to the front of the
truck, near the radiator, on the fender ledge, so I can install a full
size Group 24 battery on the passenger side. With the compressor there,
it'll JUST fit width-wise, but the compressor pulley gets in the way..
relocate the washer bottle to where the pulley is, and I have the full
width area to mount my extra battery.
3-17-98 - I did a little more work on the compressor install over the
last week. I installed an water / particle filter in-line from the
compressor. Instead of mounting it on the side of the compressor like I
had wanted to, I mounted it on the fender, with the rest of my "T"
arrangement. It's held securely, and ran me $20 at Walmart.
I also finished installing the alternator.. this, after a weekend trail
ride where the main bolt that holds the alt. in place lost the nut off
the back, and tried to wiggle it's way out.. and drop my alt!
I took one of the old spring inner sleeves that I had lying around after
my lift kit install, and bought a 3" x 1/4(?) course thread bolt. I
should've bought a 3.5" bolt. Anyhow, I installed the old swing-arm
tensioner (with the wrong kink) on the bracket, and it then set a couple
inches "behind" the tensioning bolt hole in the alt. I then cut the old
spring bushing sleeve down (with my new air-powered die grinder!), and
placed it between the tensioner and the
alt, and put the new (longer) bolt through. Works great. I didn't have
a lot of room to get a wrench up in there to tighten the bolt.. but there
*was* just enough room to get my nifty new air ratchet inside.. one quick
blip of the "trigger" and the bolt was nice n' tight in there. Air tools
are cool!
I've also collected the parts to install a pre-air filter. With my 196,
I have a 1bbl Holley carb that leaves me with enough extra space around
the carb and the air cleaner, to install a fitting. I don't believe this
will work on the 2bbl on my '72 304V8.
Anyhow, the plan is to drill a hole through the air filter, and then
mount a 45deg elbow underneath, with a quick disconnect coupler body
attached to it. Rubber washers will go above and below the cut in the
air filter housing. I'll then put a coupler plug on the input side of
the compressor. In this manner, I can connect and disconnect the
compressor to the stock air filter, so I can remove the filter housing
when necessary. This should provide ample cleaning of the air prior to
going into the compressor.
Okay, as promised, here are a few photos of my on-board air setup.. my apologies for the blurry images.. I'll see if I can get some better shots later!
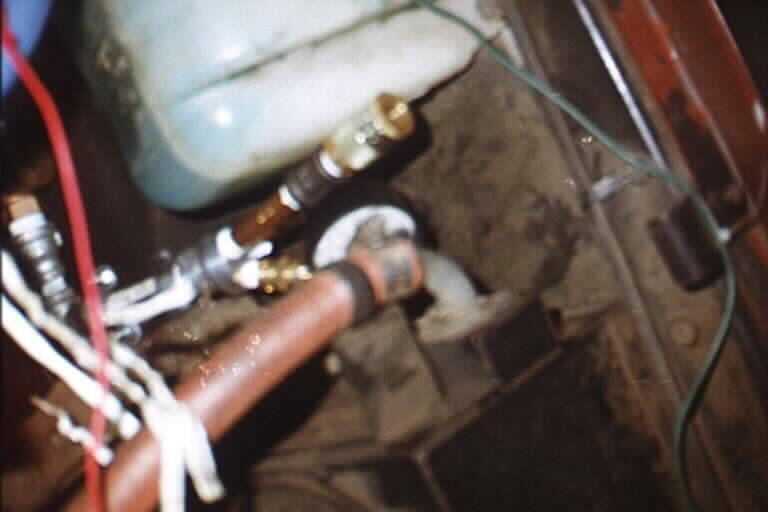
The 3-1 "mushroom Y" installed on the passenger fender. You can see the gauge and the quick connect on the top of the
Y.. the safety valve is also visible. You can see the heater and washer bottles, and the lower "T" mounted to the side of the inner fender.
Where the red clutch wire goes across, you'll see the "pipe mount clamp" that keeps the whole contraption where it is.
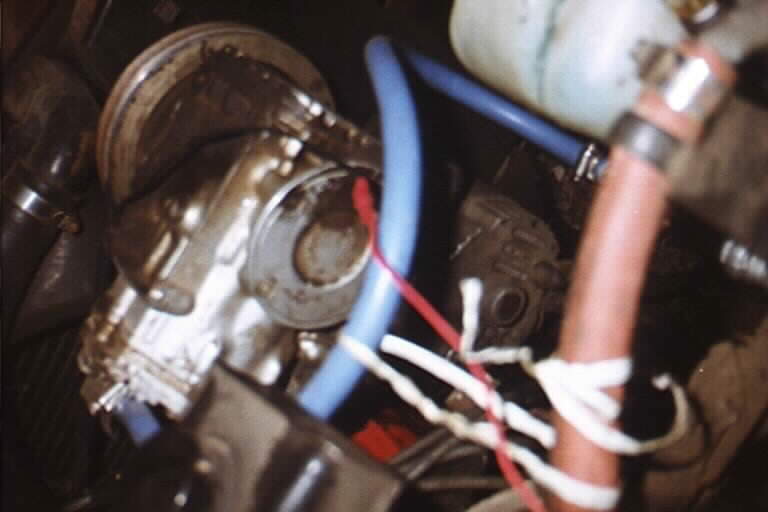
This is the compressor mounted on the passenger side of my 196. The photo is at an odd angle.. but you can see the air filter on the bottom of the photo, and how the
compressor is mounted horizontally, with the alt underneath. You can also see how the hose runs down and around to the side of the big "T" section on the inner fender.
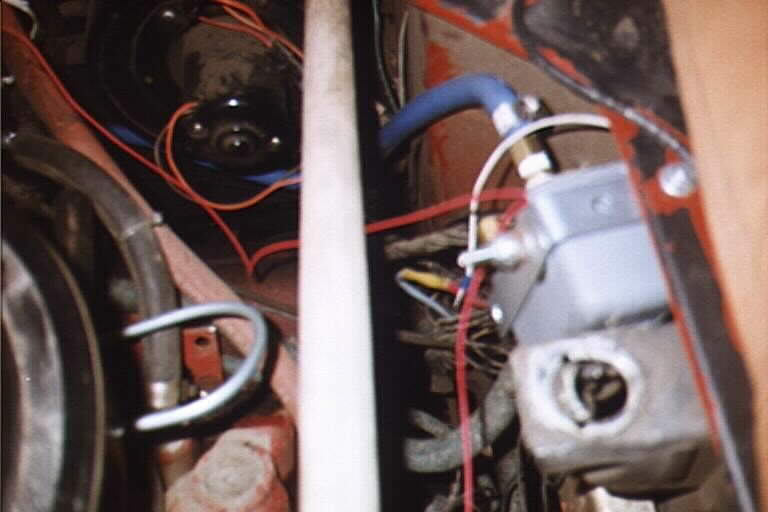
Pressure switch, mounted to the firewall/cowl.
-Tom